

Looking for the best car audio installation in Montclair, CA? Discover expert tips, top brands, and why Audio Vision is the go-to destination for high-quality car sound systems.
Product Brand: Audio Vision
Product Currency: USD
Product Price: 299
Product In-Stock: InStock
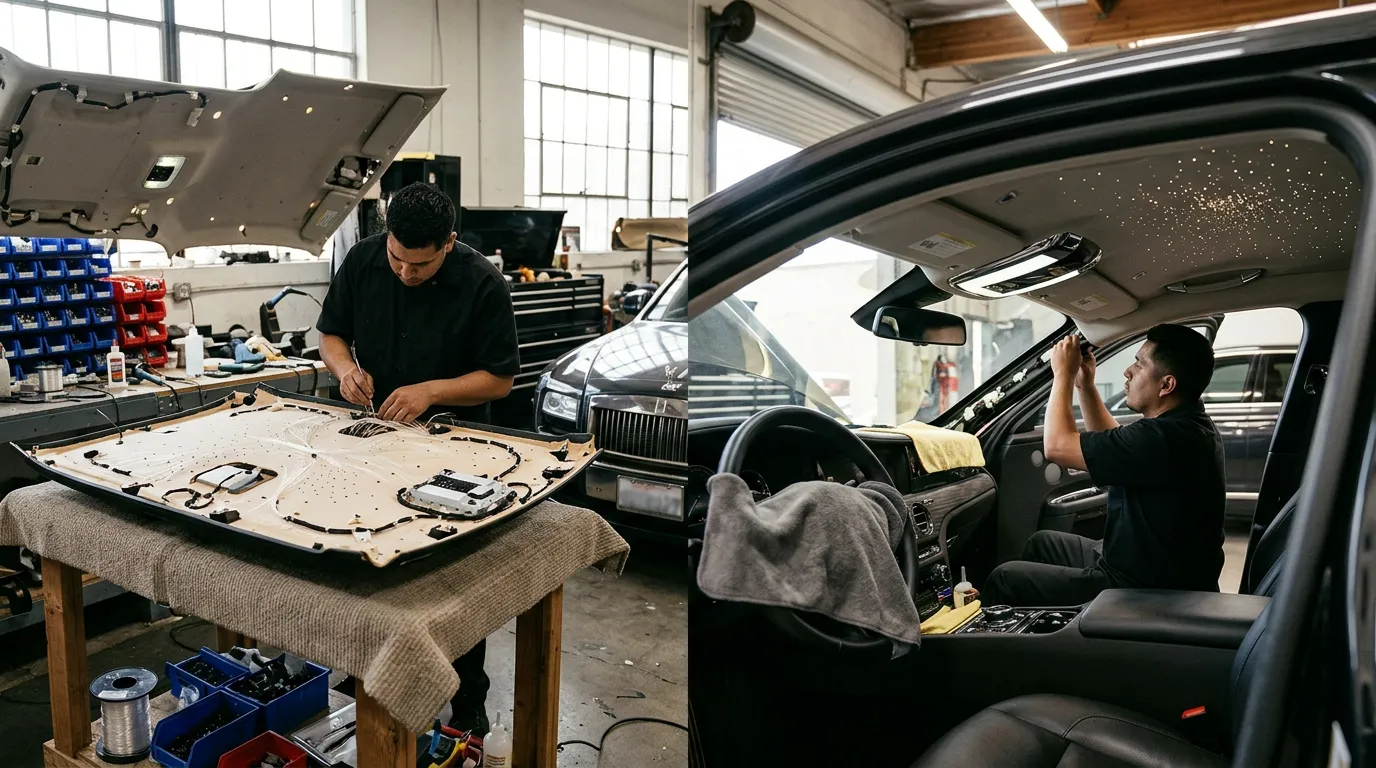
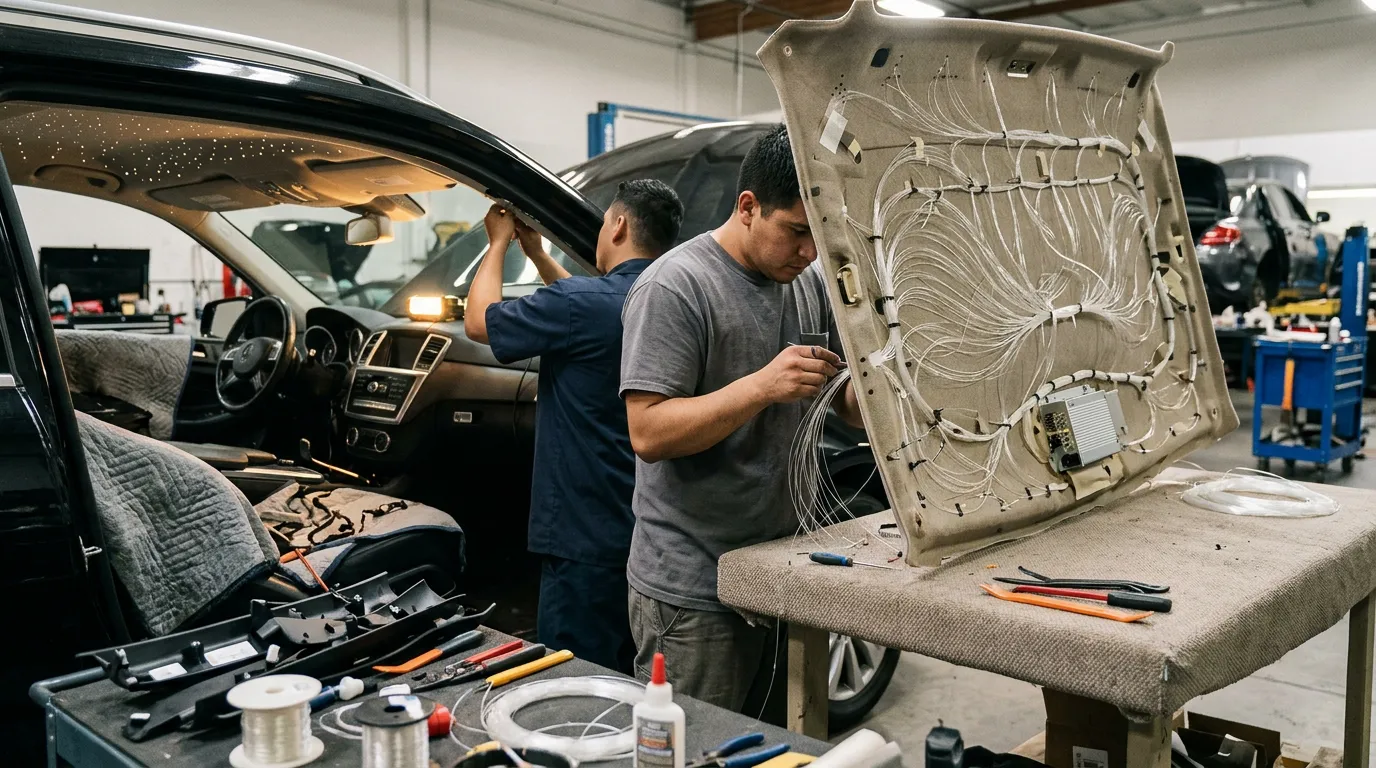
Starlight headliner installation in Pomona, CA is a custom interior project that takes more work than simply adding a few lights to the ceiling. A fiber-optic star roof requires the headliner to be removed, a star pattern to be planned, hundreds of fibers to be placed through the material, lighting hardware to be wired, and the interior to be carefully reassembled.
That process explains why the timeline can vary so much from one vehicle to another.
A compact sedan with a standard roof may move through the installation faster than a large SUV with a panoramic sunroof, rear climate controls, multiple overhead lights, and a much larger headliner. Star count, shooting-star effects, headliner condition, and the material used on the roof can also change the amount of work.
For drivers in Pomona, CA who want a custom star roof, knowing what happens during installation makes it easier to plan the appointment and care for the finished headliner afterward.
Audio Vision provides starlight headliner installation from its nearby Montclair, CA shop and serves Pomona, CA along with surrounding Inland Empire communities.
A professionally installed fiber-optic headliner is commonly a full-day custom job, and some vehicles can require more time.
One professional starlight installer reports completing many standard builds in one day while estimating that the hands-on work involved in a typical headliner can amount to roughly 15 to 20 hours. Vehicles with sunroofs can require more work because the fibers have to be routed around the opening, tracks, wiring, and other roof hardware.
That does not mean every starlight headliner installation in Pomona, CA will take the same number of hours.
The actual timeline depends on:
A smaller vehicle with a straightforward roof may require less work than a three-row SUV with a large panoramic glass roof.
For that reason, the best timeline comes after the installer sees the exact vehicle.
A fiber-optic star roof is built one light point at a time.
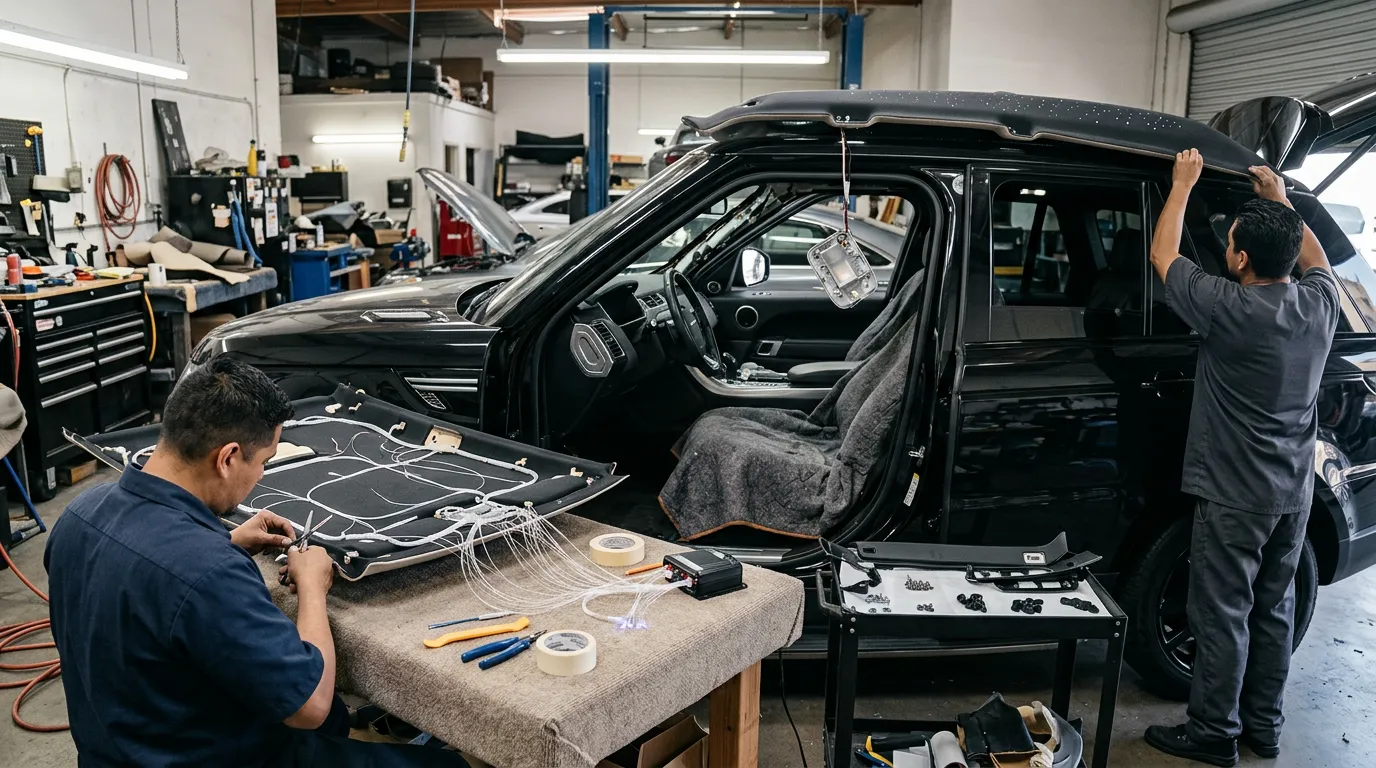
Headliner Help describes the process as removing the headliner board, mapping the desired star pattern, threading fiber-optic strands through the board and fabric, securing and trimming those strands, connecting them to a hidden LED light source, and reinstalling the finished headliner.
That is very different from mounting an LED strip along the roof.
A 500-star headliner can involve hundreds of individual fiber placements.
A denser design can involve many more.
Each strand needs to reach the light source without becoming pinched or interfering with the way the headliner fits back into the vehicle.
The installer also has to work around:
A clean finished roof depends heavily on the work happening behind the material where the owner will never see it.
The process should begin with the vehicle itself.
Before the headliner comes down, the installer needs to look at its size, shape, condition, and attached components.
This is also when you should discuss the appearance you want.
Questions may include:
If the roof material is already loose, stained, torn, or separating from the backing, that needs to be addressed before the starlight work is finished.
Audio Vision notes that headliner replacement and starlight installation can be planned together when the existing roof fabric already needs attention.
A properly installed fiber-optic system is normally worked on from the rear side of the headliner board.
That means the headliner needs to come out or be lowered far enough for the installer to access it.
Headliner Help lists headliner removal as part of the normal fiber-optic installation process.
Removing it may require taking down or loosening:
The board has to be handled carefully.
Headliner boards can bend, crease, crack, or break if they are forced through the vehicle incorrectly.
Sunroof vehicles add another layer because the headliner wraps around a large opening and may have less material supporting the board.
This part of the job is one reason experience with vehicle interiors matters.
Once the headliner is accessible, the star layout can be mapped.
A good star pattern usually avoids looking like a grid.
Instead, the lights are spread across the roof with changes in spacing and density so the finished headliner has a more natural night-sky appearance.
The installer also has to leave room around:
Different fiber diameters can sometimes be used to create points that appear brighter or dimmer.
If shooting stars are part of the design, those fibers also need their own planned paths.
What this means is that the pattern needs to be designed before hundreds of holes are placed into the headliner.
This is often the most time-consuming stage.
Each fiber needs to be routed through the back of the headliner so that a small tip appears on the visible side.
Headliner Help notes that every strand creates a piercing point through the headliner board. Careful handling matters because poor placement can weaken or damage the board.
The fibers are usually secured behind the headliner after their positions are set.
Then the strands are routed toward the area where the light engine will be mounted.
The installer must prevent:
The visible ends are eventually trimmed close to the material to create the individual star points.
A higher star count means this stage takes longer.
There is no shortcut around hundreds of individual placements if you want a dense fiber-optic roof.
The fibers themselves do not contain individual electrical lights.
Instead, the strands carry light from an illuminator, commonly called the light engine.
That component needs a suitable hidden mounting area.
The system may also include:
The wiring then needs to connect the lighting equipment to an appropriate power source.
The location needs to allow the fibers to reach the light source without creating routing problems behind the interior trim.
The light engine should also stay out of the way of normal vehicle use.
A finished starlight headliner installation in Pomona, CA should look like the stars belong in the roof without controllers and wiring hanging into the passenger area.
The system should be tested before everything goes back together.
This gives the installer a chance to check:
Testing before final assembly makes sense because the installer still has access to the back of the headliner and lighting hardware.
If something needs adjustment, it is much easier to handle before all of the trim is reinstalled.
The visible star points can also be checked for spacing and brightness.
Once the lighting system passes its tests, the headliner goes back into the vehicle.
The installer then reinstalls the interior pieces removed earlier.
That may include:
Everything needs to sit correctly so the finished interior does not have loose trim, gaps, or a sagging roof panel.
The system should be tested again after reassembly.
Dome lights, roof controls, sunroof controls, microphones, and other items that were disconnected during the job should also be checked.
Several things can add time to a starlight job.
A panoramic glass roof leaves less traditional headliner area and creates more edges to work around.
Going from a lightly populated roof to a dense field means placing many more fibers by hand.
Shooting-star effects require added planning and lighting hardware.
Sagging fabric, cracked backing, stains, or previous repairs may need attention before the fiber installation can be completed.
More roof area may mean more fibers and longer routing.
Rear entertainment screens, climate vents, speakers, consoles, and other equipment can add removal and reassembly work.
Older wiring or previous upholstery changes may need to be checked before new lighting is added.
If timing matters because you need the vehicle back for work or school, ask about the expected completion schedule before dropping it off.
After pickup, treat the roof as a custom upholstered surface rather than something designed to be handled frequently.
Avoid pulling on visible fiber points.
Do not press objects into the headliner.
Keep tall cargo from rubbing against the roof.
Be careful when placing long items inside an SUV or hatchback.
A stroller, furniture box, bicycle handlebar, fishing rod, or other tall object can scrape the material if it is pushed against the ceiling.
If your installer gives you a waiting period before cleaning the roof, follow that instruction.
Headliner material, adhesive, and installation methods can vary.
The shop that worked on the vehicle knows which materials were used.
Cleaning should be gentle.
The correct method depends on the headliner material.
If the headliner uses Alcantara or a similar microfiber-style material, the material manufacturer recommends routine dust removal with a soft brush or dry cloth.
Alcantara also recommends a slightly moistened white cotton cloth for routine cleaning and warns against wetting the material excessively.
For stains, Alcantara says not to pour cleaning products directly onto the surface and warns against aggressive rubbing.
Those ideas are especially useful around a fiber-optic headliner because hundreds of tiny fiber ends pass through the material.
A cautious cleaning routine can include:
If you do not know which fabric was used, ask the installer before applying upholstery chemicals.
The visible star tips are small, but they are still part of a custom lighting system.
Avoid picking at them.
Do not try to pull a point farther through the fabric because one star looks shorter than another.
Do not cut fibers yourself unless the installer tells you to.
Keep adhesive hooks, stickers, pins, clips, and other accessories away from the headliner.
You should also be careful when vacuuming.
Holding a vacuum nozzle directly against the roof can pull at the material or fiber tips.
A soft brush or cloth is usually a safer way to remove light dust.
The catch is that a star roof is no longer an ordinary untouched headliner. Treating it gently helps protect both the upholstery and the lighting work behind it.
One dark point does not always mean the entire system has failed.
A single fiber can sometimes become damaged or disconnected while the main light engine continues to work.
If an entire group of stars stops working, the issue may be closer to the fiber bundle, controller, or light source.
If the whole roof stops lighting, check the system according to the installer instructions.
Do not start removing pillar trim or pulling the headliner down yourself unless you have experience working around vehicle interior wiring and trim.
Contact the installer and describe what happened.
If possible, take a photo or short video showing which section is affected.
That can help the shop understand whether the issue involves one fiber, one lighting section, or the full system.
An exterior car wash does not normally touch the headliner.
Still, it is smart to inspect the vehicle for any existing roof or sunroof water leaks before adding custom upholstery work.
Water entering around a sunroof, antenna, windshield edge, or roof seal can damage headliner material whether the vehicle has starlights or not.
Audio Vision’s headliner guidance lists water staining as one of the conditions owners should point out when discussing roof upholstery work.
If your old headliner has water marks, identify the source of the leak before covering the problem with new material or lighting.
For interior detailing, tell the detailer that the vehicle has a custom fiber-optic headliner.
Ask them not to saturate or aggressively scrub the roof material.
A little preparation can make drop-off easier.
Have your vehicle information ready:
Think about the look you want before arriving.
You may want to discuss:
Clear personal items from the interior, especially anything around seats, floors, rear cargo areas, or roof storage.
The installer may need room to move trim pieces and the headliner board through the vehicle.
If your car has a dash camera, aftermarket alarm sensors, roof-mounted electronics, or previous custom wiring, mention that before work starts.
Drivers looking for starlight headliner installation in Pomona, CA can visit Audio Vision nearby in Montclair, CA.
Audio Vision lists Pomona, CA among the communities it serves for starlight headliner work.
The shop is located at:
Audio Vision
5521 Holt Blvd
Montclair, CA 91763
Phone: (909) 983-4500
Hours: Monday through Sunday, 9:00 AM to 7:00 PM
Along with starlight headliner installation, Audio Vision works on other vehicle lighting and electronics projects, including car LED lighting and car audio.
The Montclair location also serves nearby communities including Pomona, CA, Claremont, CA, Ontario, CA, Chino, CA, Chino Hills, CA, and Rancho Cucamonga, CA.
If you are in Pomona, CA and planning a star roof, call (909) 983-4500 or contact Audio Vision online to discuss your vehicle, desired star count, lighting effects, headliner condition, and appointment timeline.
The timeline depends on the vehicle, number of fibers, roof layout, and lighting effects. Professional installers may complete some standard builds in a full day, while more involved vehicles can require additional time. One installer reports roughly 15 to 20 hours of hands-on work for a standard headliner and more for some sunroof vehicles. Ask for a vehicle-specific timeline before drop-off.
A properly planned fiber-optic install normally requires access to the back of the headliner board. Headliner Help describes headliner removal, pattern mapping, fiber placement, light-source mounting, and reinstallation as parts of the normal installation process.
Possibly, but the headliner condition should be addressed as part of the project. Audio Vision notes that headliner replacement and starlight work can be discussed together when the existing material is already loose or damaged.
Use care around the star points and follow the cleaning directions for the material installed in your vehicle. For Alcantara, the manufacturer recommends gentle dusting with a soft brush or dry cloth and light cleaning with a slightly damp cloth without excessive wetting. Avoid aggressive rubbing and do not pour cleaner directly onto the upholstery.
Yes. A panoramic roof changes the available headliner area and adds edges, tracks, wiring, controls, and other components that the installer may need to work around. The final timeline depends on the vehicle.
Do not start pulling on fibers or removing roof trim. Contact the installer and explain whether one star, a group of stars, or the entire system stopped illuminating. A photo or video can help show the affected area.
Audio Vision is located at 5521 Holt Blvd, Montclair, CA 91763, near Pomona, CA, and lists Pomona among its starlight headliner service areas. Call (909) 983-4500 or use the Audio Vision contact page to discuss your vehicle and schedule an appointment.
Looking for the best car audio installation in Montclair, CA? Discover expert tips, top brands, and why Audio Vision is the go-to destination for high-quality car sound systems.
Product Brand: Audio Vision
Product Currency: USD
Product Price: 299
Product In-Stock: InStock

Acima, a flexible lease-to-own option that helps you get the car upgrades you love—without needing perfect credit. Whether you’re looking for car audio, video, security systems, window tint, wheels, auto lighting, or accessories, Acima makes it easy with no credit needed and convenient payment options. Get what you want today and pay over time, hassle-free!

Snap Finance is here to help you get the car audio, video, security, window tint, wheels, lighting, and accessories you need today. With Snap Finance, you can shop now and pay later, thanks to their flexible payment plans that consider more than just your credit score. Applying is fast and easy, and you’ll receive a decision in seconds. Take advantage of stress-free payment options that fit your payday schedule, so you can upgrade your ride without the wait!
Explore the many services we offer by clicking the boxes below


|
|
|
|
|
|
|
|
|
|
|
|
|
|
|
|
Starlight Headliner Installation in Pomona, CA: Timeline & Aftercare
|
Starlight Headliner Installation in Pomona, CA: Timeline & Aftercare
|
Starlight Headliner Installation in Pomona, CA: Timeline & Aftercare
|
Starlight Headliner Installation in Pomona, CA: Timeline & Aftercare
|
|
|
|
|
|
|
|
|
|
|
|
|
|
|
|
|
|
|
|
|
|
|
|
|
|
|