
Looking for the best car audio installation in Montclair, CA? Discover expert tips, top brands, and why Audio Vision is the go-to destination for high-quality car sound systems.
Product Brand: Audio Vision
Product Currency: USD
Product Price: 299
Product In-Stock: InStock
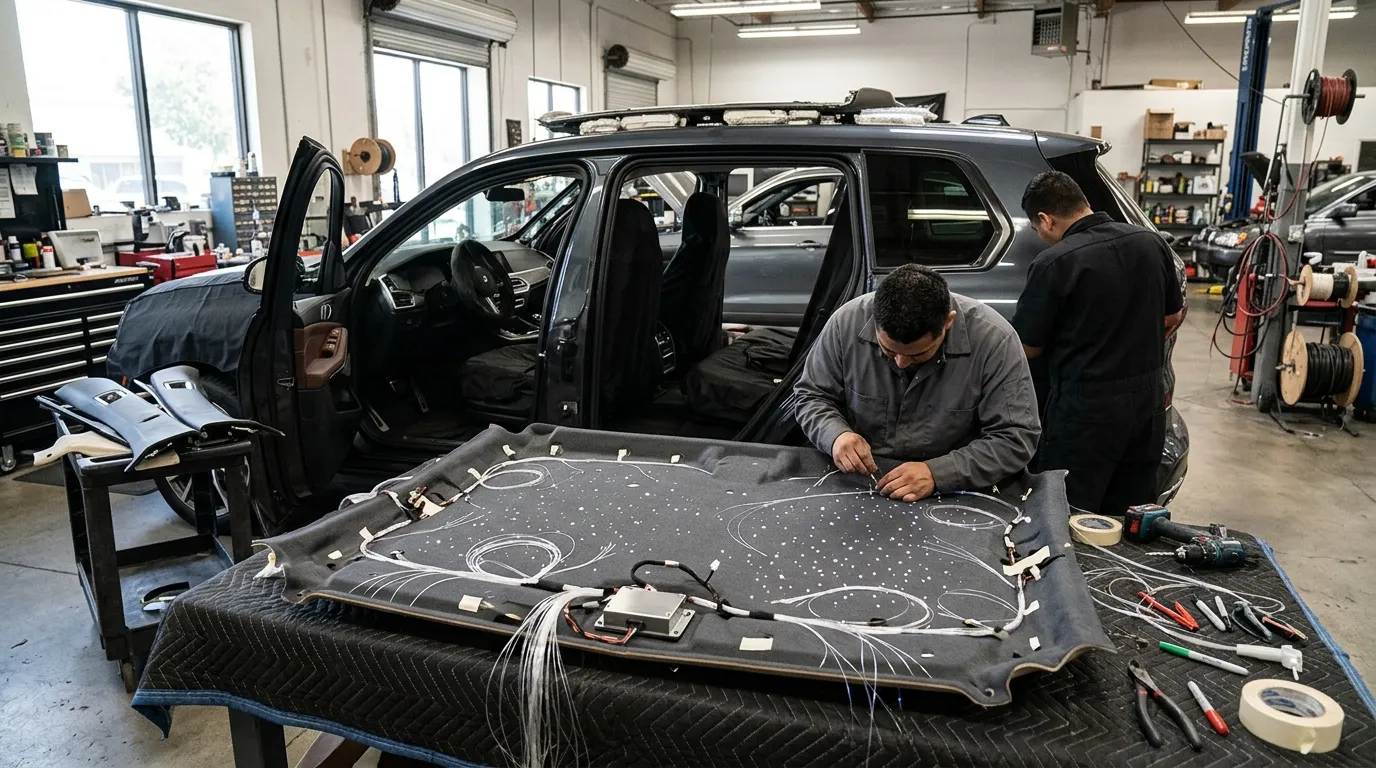
Starlight headliner installation in Chino Hills, CA involves much more than adding lights to the roof of your vehicle. A true fiber-optic installation can require removing the headliner, mapping hundreds of individual star locations, threading fibers through the material, mounting a hidden light source, routing wiring, testing the controls, and carefully putting the interior back together.
The result can turn an ordinary roof into a custom field of small glowing points. Depending on the system, those stars may change colors, twinkle, dim, or include shooting-star effects.
The work behind the finished headliner is what makes the difference.
A rushed installation can leave uneven stars, visible fibers, damaged headliner material, loose trim, or wiring that does not sit properly behind the interior. A well-planned installation treats the headliner, lighting system, and vehicle interior as one project.
For drivers in Chino Hills, CA, Chino, CA, and Ontario, CA, this guide explains what happens during a professional starlight headliner installation and which vehicle features can make the job more involved.
Audio Vision provides starlight headliner installation from its Montclair, CA shop and serves Chino Hills, CA and nearby Inland Empire communities.
A fiber-optic starlight headliner uses many thin optical fibers to create small points of light across the vehicle’s ceiling.
The fibers themselves are not individual electrical bulbs.
Instead, the strands carry light from an LED-powered illuminator, often called a light engine. The fiber ends appear through the headliner material as stars.
Headliner Help describes the process as placing hundreds or thousands of fiber-optic strands through the roof lining, with the strands connected to one or more hidden LED light sources.
This setup allows a large number of star points to operate from a relatively small lighting unit.
Depending on the equipment, the finished system may offer:
The appearance depends heavily on fiber placement.
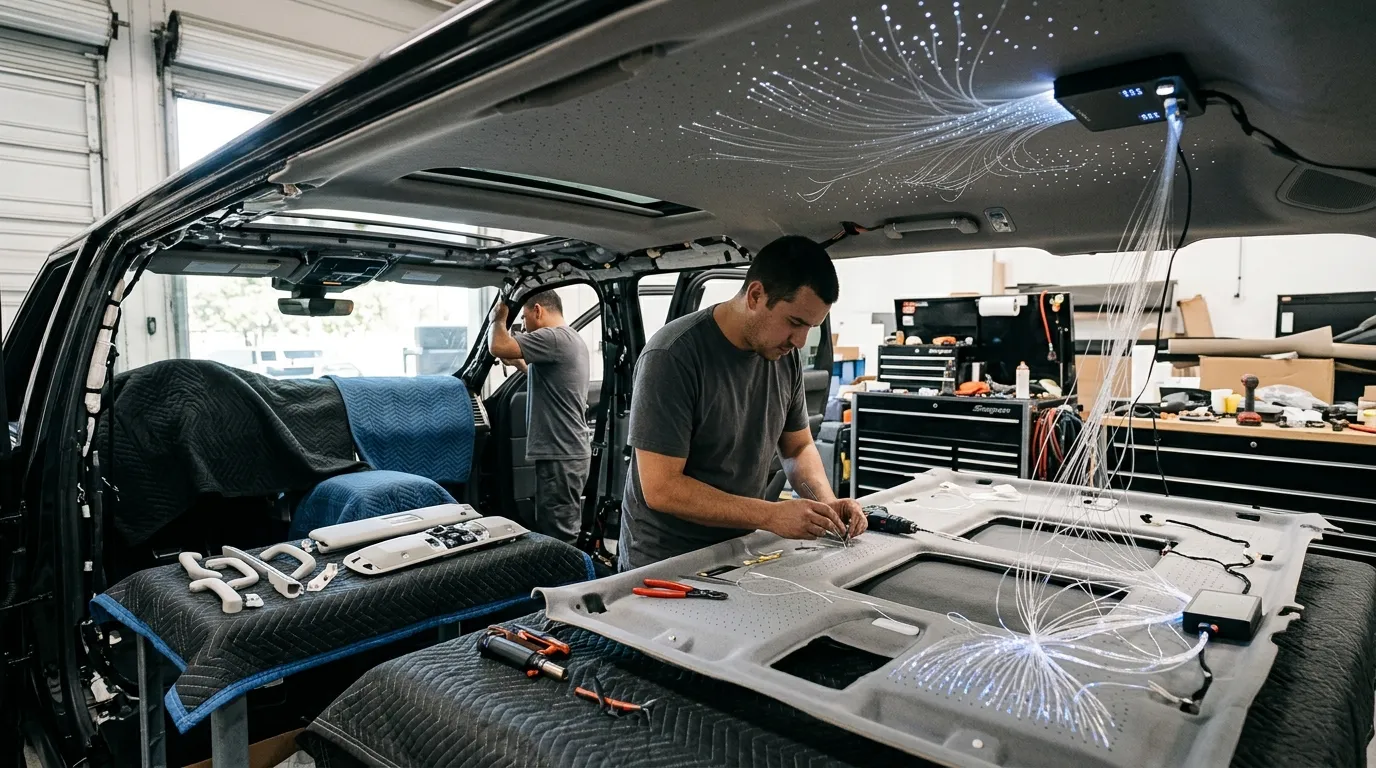
A sparse roof can look subtle. A higher-density pattern can fill much more of the headliner.
Before work begins, the installer needs to understand both the vehicle and the look you want.
A consultation may cover:
The roof layout also needs to be examined.
Modern vehicles may have several components mounted around or behind the headliner, such as dome lights, microphones, overhead switches, grab handles, wiring, antennas, and sunroof hardware.
The starlight layout needs to work around those areas.
If you are planning a starlight headliner installation in Chino Hills, CA, having your exact vehicle information available before booking helps the installer determine what the project will involve.
The first physical check is the headliner itself.
The installer should look for:
This matters because the fiber system is being installed through the headliner.
If the fabric is already separating from its backing, placing hundreds of fibers through it does not fix the underlying upholstery problem.
A worn headliner may need to be repaired or re-covered as part of the project.
Water stains also deserve attention.
A stain near a sunroof, windshield edge, roof antenna, or roof seam may point to a leak. That leak should be addressed rather than hidden behind new upholstery work.
A professional fiber-optic installation commonly requires access to the back of the headliner.
That means roof-related trim may need to be removed or loosened.
Depending on the vehicle, this can include:
Starlight Custom notes that headliner removal varies considerably from one vehicle to another. Some cars require careful maneuvering to get the headliner board through a door or hatch.
In certain vehicles, seats or other interior pieces can also affect how easily the board comes out.
The headliner board itself needs gentle handling.
It can bend, crack, crease, or become permanently distorted if forced.
That is one reason this stage can be just as important as placing the stars.
Once the back of the headliner is accessible, the star locations can be mapped.
A natural-looking design should not look like evenly spaced rows of lights.
Instead, the pattern may use changes in spacing and density to create a scattered night-sky effect.
The installer also needs to work around mounting areas for:
Headliner Help describes star mapping as part of the normal installation process before the fibers are threaded through the board.
This stage also determines how dense the finished roof will appear.
A smaller coupe may need fewer points to fill the visible roof area than a large SUV.
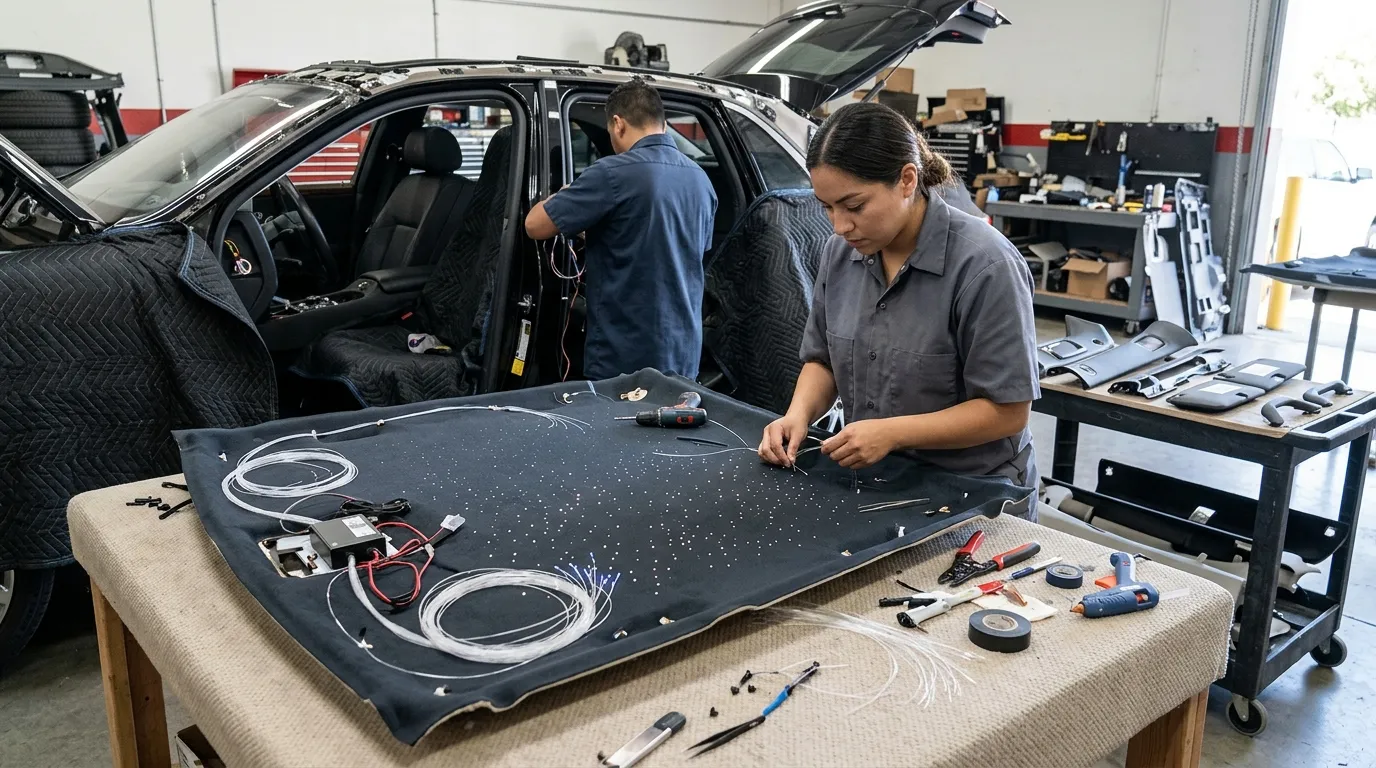
This is where much of the hand work happens.
Each fiber needs a path through the headliner so its tip becomes visible from inside the vehicle.
A 500-star design can mean hundreds of individual placements.
A 1,000-star design involves even more.
Headliner Help notes that every strand creates a piercing point in the board and fabric, which is why poor placement or rough handling can damage the headliner.
Each point needs to be small enough to avoid an oversized opening while still allowing the fiber through.
The installer repeats that process across the roof until the planned pattern is complete.
Here is why higher-density roofs require much more work.
The fibers are not installed as one large lighting panel. Each visible point comes from a strand that has to be routed and placed.
Once the fibers are positioned, they need to stay in place.
The back side of the headliner can end up carrying a large network of strands.
Those fibers need to be routed toward the light source without getting in the way of the headliner mounts or other components.
The installer needs to avoid:
The fibers also need to remain organized enough to reach the light engine.
This work is hidden once the roof goes back together, but poor routing can still create problems.
A large bundle placed in the wrong location may cause the headliner to sit incorrectly against the roof.
The light engine supplies the light that travels through the fibers.
It is normally mounted out of sight.
The best location varies by vehicle and system design.
The installer has to consider:
Some systems use a single light engine.
Larger or more complicated designs may use more than one lighting unit.
The controller may support functions such as RGB color changes, dimming, twinkle modes, or remote operation.
The components should stay hidden while remaining positioned in a location suited to the installation.
The light engine still needs electrical power.
The wiring should be routed cleanly through the vehicle rather than left visible around the roof or pillars.
The exact connection method depends on the lighting system and vehicle.
The installer may need to route wiring through interior trim areas to reach the chosen power source.
Care is needed around existing vehicle wiring.
Roof and pillar areas can contain wiring for factory electronics and other systems.
The installer needs to understand what is already behind the panels before adding anything new.
Audio Vision also provides car LED lighting installation for customers who want to combine a starlight roof with other custom lighting.
Before the interior is fully reassembled, the starlight system should be tested.
This is the time to check:
Testing before reassembly makes corrections easier.
If a section is not lighting correctly, the installer still has access to the fiber routing and hardware.
Individual areas of the headliner can also be inspected for star distribution.
The visible fiber ends can then be finished so they sit correctly against the headliner material.
After testing, the headliner goes back into place.
The installer then reinstalls the trim and roof components removed earlier.
That can include:
The headliner should sit correctly without visible gaps or loose sections.
The vehicle’s original roof functions should also be checked after reassembly.
If the car has a sunroof, its controls should be tested.
Dome lights, microphones, overhead switches, and other equipment that was disconnected should also be checked.
The starlight system should receive another test after everything is back together.
A sunroof changes the available headliner area.
A panoramic roof changes it even more.
The installer has to plan around:
A vehicle with a large panoramic roof may have less fabric area for stars than a similar vehicle with a solid roof.
That does not mean a starlight system cannot work.
It means the pattern may need to use the remaining headliner sections differently.
Some designs also pair fiber stars with accent lighting around the roof opening.
If your Chino Hills, CA vehicle has a sunroof or panoramic roof, mention that when discussing the installation.
Star count has a direct effect on the amount of fiber placement.
A lower-density design may use a few hundred points.
A denser headliner can use many more.
Increasing the count adds work because each strand still has to be:
Vehicle size matters too.
A 500-star pattern may look relatively dense in a small coupe but more spread out across a large SUV.
The right count depends on the roof size and the appearance you want.
Shooting-star effects involve more than turning the entire roof on and off.
They require lighting sequences that create the appearance of light moving across part of the headliner.
That can mean additional fiber routing, lighting hardware, or controllers.
RGB systems also let the fiber points display different colors through the light engine.
Depending on the system, controls may include:
Talk about these choices before installation begins.
Adding more effects after the entire headliner has already been completed may require additional interior work.
A sagging headliner should be inspected before fibers are added.
Sagging normally means the fabric or foam layer is separating from the headliner board.
Adding fiber optics does not repair that separation.
If the existing material is in poor condition, the better route may be to address the upholstery while the headliner is already out.
That gives the installer a cleaner surface for the star pattern and prevents you from completing a large lighting project on material that already needs replacement.
The same applies to torn or badly stained material.
Tell the installer about existing roof problems during the consultation.
The headliner is large, relatively fragile, and surrounded by interior trim.
Starlight Custom describes removal as one of the more difficult stages of a fiber-optic installation because access differs between vehicles and the board can be hard to remove from the cabin.
A poor removal attempt can lead to:
Professional installation also helps keep the fibers, wiring, lighting hardware, and trim organized as one job.
The finished roof should look clean when the system is off as well as when it is illuminated.
Before bringing your vehicle in, remove personal items that could get in the way of interior work.
Clear items from:
The installer may need room to move interior panels and the headliner.
Also mention any aftermarket equipment already in the vehicle, such as:
Have your vehicle year, make, model, and trim ready.
If the headliner has a stain, sagging section, tear, or previous repair, point that out before the job starts.
The more the installer knows about the vehicle before disassembly, the easier it is to plan the work.
Drivers looking for starlight headliner installation in Chino Hills, CA can contact Audio Vision in nearby Montclair, CA.
Audio Vision’s current Chino Hills starlight service page lists the company as serving customers from Chino Hills, CA, and its Inland Empire starlight page also includes Chino Hills in the service area.
Audio Vision can help with:
The shop is located at:
Audio Vision
5521 Holt Blvd
Montclair, CA 91763
Phone: (909) 983-4500
Hours: Monday through Sunday, 9:00 AM to 7:00 PM
Audio Vision serves drivers from Chino Hills, CA, Chino, CA, Ontario, CA, Montclair, CA, Pomona, CA, Claremont, CA, Rancho Cucamonga, CA, and other Inland Empire communities.
Call (909) 983-4500 or contact Audio Vision online to discuss your vehicle, desired star density, roof layout, lighting effects, and appointment.
A fiber-optic installation commonly involves inspecting and removing the headliner, mapping the star pattern, placing individual fibers, securing and routing those fibers, mounting a hidden light engine, wiring the system, testing the effects, and reinstalling the interior.
Professional installations commonly require access to the rear of the headliner. Headliner Help describes removal, star mapping, fiber threading, finishing, and reinstallation as parts of the process. The exact removal method depends on the vehicle.
Yes, many vehicles with sunroofs or panoramic roofs can still receive starlight work. The installer has less traditional headliner area available and needs to work around the roof opening, tracks, switches, wiring, and other components.
The star density can usually be planned around the roof size and desired appearance. More fibers create a denser look and require more individual placement work.
Many fiber-optic systems use RGB-capable light engines that allow color changes. Available modes depend on the controller and lighting equipment selected for the installation.
Shooting-star effects are available with certain systems. They require additional planning and lighting control compared with a standard static or twinkling star field.
Audio Vision serves Chino Hills, CA from its shop at 5521 Holt Blvd, Montclair, CA 91763. Call (909) 983-4500 or use the Audio Vision contact page to discuss your vehicle and schedule an appointment.
Looking for the best car audio installation in Montclair, CA? Discover expert tips, top brands, and why Audio Vision is the go-to destination for high-quality car sound systems.
Product Brand: Audio Vision
Product Currency: USD
Product Price: 299
Product In-Stock: InStock

Acima, a flexible lease-to-own option that helps you get the car upgrades you love—without needing perfect credit. Whether you’re looking for car audio, video, security systems, window tint, wheels, auto lighting, or accessories, Acima makes it easy with no credit needed and convenient payment options. Get what you want today and pay over time, hassle-free!

Snap Finance is here to help you get the car audio, video, security, window tint, wheels, lighting, and accessories you need today. With Snap Finance, you can shop now and pay later, thanks to their flexible payment plans that consider more than just your credit score. Applying is fast and easy, and you’ll receive a decision in seconds. Take advantage of stress-free payment options that fit your payday schedule, so you can upgrade your ride without the wait!
Explore the many services we offer by clicking the boxes below


|
|
|
|
|
|
|
|
|
|
|
|
|
|
|
|
Starlight Headliner Installation in Chino Hills, CA: What’s Involved
|
Starlight Headliner Installation in Chino Hills, CA: What’s Involved
|
Starlight Headliner Installation in Chino Hills, CA: What’s Involved
|
Starlight Headliner Installation in Chino Hills, CA: What’s Involved
|
|
|
|
|
|
|
|
|
|
|
|
|
|
|
|
|
|
|
|
|
|
|
|
|
|
|